

Will Old 1x12 Plank Subfloor Split When Nailing The Hardwood Flooring
How to Install Pine Floors
Complete instructions for DIY installation of easy-care wide-plank pine flooring.
![]() Time
Time
Multiple Days
![]() Complexity
Complexity
Advanced
![]() Toll
Toll
$501-g
Introduction
If you lot love the look and experience of forest below your feet, wide-plank middle pine flooring is an heady choice. It cant quite transport you to the Erstwhile Southward, but a pine floor will transform your rooms with its soft patina and rich glow. It has two other plusses: Its easier to install than hardwood. You tin can skip the tricky sanding that goes along with an oak or maple flooring. And it actually looks richer and more attractive as it ages. In this article, well prove you how to choose and order your material, install information technology and cease information technology with our piece of cake finish method.
Tools Required
Materials Required
- 120-grit sandpaper
- 8d finish nails
- Cut nails
- Penetrating oil
- Pine flooring
- Rosin paper
- Forest putty
Store for a pine way you dear
Pine floors wait even amend every bit they age.

Pine floors are available in a variety of widths and grades. Longleaf Southern pine, or "center pine," is known for its dense, bister heartwood. It comes in a variety of widths and grades. It can exist clear (knot-free) with a tight, directly grain, or it can include more character such every bit small or large knots. This iii/4-in. thick solid plank flooring is milled with a natural language and groove. The ends of boards can also have a tongue and groove. This feature is chosen end-matching. The joints betwixt these boards tin can fall between joists, only you wouldn't face-nail these ends. This would change the look somewhat.
Club a sample kit from a supplier to help cull the exact material y'all desire. Prices vary depending on the pino's source, grade and width, with the antiquarian pine being the about expensive. Nosotros recommend material that requires little or no sanding.
We chose 10-in. broad, new heart pino with 50 to 80 percent centre content and without terminate matching. Run across "Pine Flooring Options" for more details.
Work through key layout details before getting started
Pine flooring cross department

The 3/4-in.-thick solid plank flooring shown is milled with a tongue and groove. The natural language-and-groove pine flooring must run perpendicular to the floor joists. To keep the wide boards from cupping, you'll face-smash them with cut nails driven through the subfloor and into the joists (Photograph 18). For the best results, describe the flooring programme to scale and lay out rows of boards (Fig. A). Shift the layout equally needed to avoid very narrow pieces at the walls or at other features like around the fireplace. Later y'all'll transfer your programme to the floor and snap chalk lines at near iii-ft. intervals to go on the rows running direct.
Calculate the square footage of the room and add together 10 to 15 percent to permit for choice and waste. It's amend to have a few leftover pieces than to pay the shipping for one or two additional boards. Also guild the cut nails and the oil terminate. The supplier will propose on the amounts needed. There may exist an additional fee for shipping. Schedule delivery early on so the flooring can acclimate indoors to your home'due south moisture level. This is a very important step.Store the wood on location for at least 10 days. To proceed wood floors stable, try to maintain shut to 50 percent relative humidity in your home year-round.
Draw the room's floor plan to calibration.
- Depict the centerline of the room.
- Lay out the board runs using their actual width.
- The lath at the wall should be at least half width. If necessary, shift the boards half a lath width at the centerline.
- Avoid thin slivers. For example, note the notched board at the hearth.
Annotation: You can download and enlarge this plan past going to the Additional Information beneath.
Pine flooring options
Yous can purchase heart pine flooring in a diversity of widths and grades. Stain it or get out it natural and topcoat information technology with an oil or varnish. Most people prefer a articulate oil finish. The pine volition develop a slightly darker patina with age and exposure to low-cal. Iv things to wait for in eye pine flooring:
- Antique vs. new. Antique pino flooring is milled from salvaged timbers, and compared with new pine, will typically have tighter grain and a darker color. Antique flooring tin besides take blast holes and other signs of distress.
- New- vs. old-growth. Most new pino will come up from plantation or managed-growth copse, which means fewer growth rings per inch and less density than pino cut from erstwhile-growth trees. Boards cutting from old-growth trees will have a grain more than similar to that of the antiquarian pine.
- Centre content. The woods at the eye of the tree (heart) is darker than the wood at the exterior of the tree (sapwood). Centre content is measured as a per centum of the total lath. Consider buying pine with at least 75 to 80 percent heart.
- Articulate vs. knots. Boards are graded from clear (no knots) to large knots. Tight knots add interesting character to the pino flooring.

Project stride-past-step (21)
Step 1
Pry up the floor and underlayment

Carefully pry the baseboard and door trim from the wall and set it aside. Then remove the floor covering and underlayment (if you lot have any) to get to the subfloor. Underlayment is a layer of plywood or particleboard often plant under carpet or vinyl. Now is the time to practice repair work on the subfloor. Remove the existing floor roofing and pry upward the underlayment with a pry bar, leaving the subfloor intact. Pull all protruding nails. Walk the floor to check for loose or squeaky spots in the subfloor. To tighten the subfloor, drive ii-in. screws into the joists.
Hardwood Floor Sanding: Do It Yourself Tips
Step 2
Cutting the door jambs

Walk around the room to locate whatsoever squeaks. Since the cause of most squeaks is a loose subfloor rubbing up and downwardly confronting nails, bulldoze wood screws into the joists below to tighten upward the subfloor.
Cut out and supervene upon any damaged subfloor. Also look for loftier spots, especially at seams. If a 4-ft. straightedge shows a 1/8-in. or bigger ascent, belt-sand it off with a coarse grit. Use the blast lines to find the location of the flooring framing (joists) and marking the walls for reference. Undercut any jambs to allow the new flooring to slide underneath. Undercut the door jambs (and the trim if it'southward staying on) with a handsaw. Use a piece of fleck flooring equally a peak guide; this allows the new flooring to slide underneath. Vacuum the whole floor thoroughly.
![]()
Step 3
Mark the joist locations

Snap chalk lines on the rosin paper following your layout. Marker the joist (flooring framing) locations on the wall before rolling out and stapling downwardly the rosin paper. Snap chalk lines to mark the joists and, consulting your layout drawing, snap lines to mark out the flooring lath layout.
How to Install In-Floor Estrus
Step 4
Cut boards to length

Cut boards to length with a circular saw. Clamp on a guide to ensure square cuts and cut from the dorsum side of the board (to minimize splintering the good side). If y'all use a sliding miter saw, cut with the skilful side up.
How to Refinish Hardwood Floors
Step 5
How to install natural language and groove floor: Hand nail the first board in place

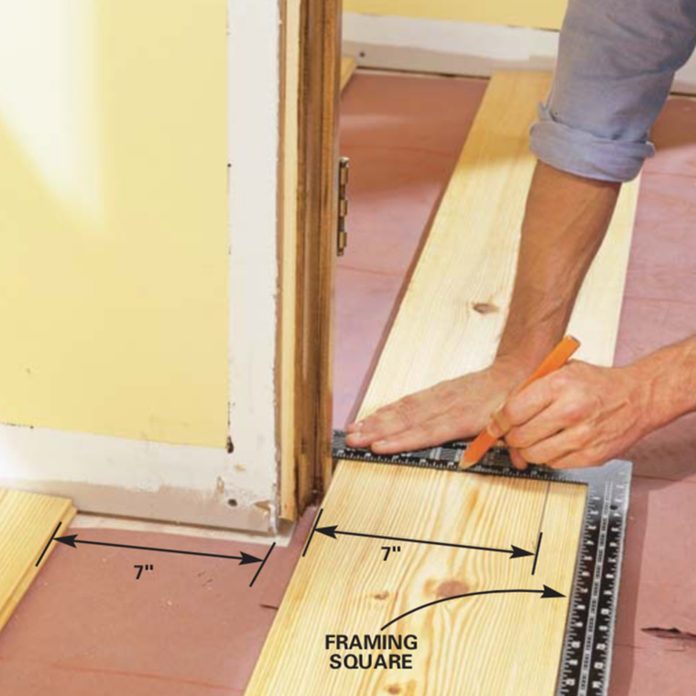
The chalk line for the outset lath must be accurate to make certain the starting time row is direct. Rip to width and align the kickoff board along the first chalk line, tongue out. Predrill and smash along the wall with 8d cease nails driven into every joist. Countersink them 1/8 in. and fill them with a natural color hardening putty. Note: Centre the butt joints on the joist layout lines. Rip the first row to width using your round saw or a table saw. Leave at least a ane/four-in. gap at the wall for wood expansion. Cutting the board ends and then butt joints (formed past boards that run into end to end) occur over floor joists.
Afterwards you lot'll nail each board finish into the joist with the decorative cut nails. Be sure to stagger butt joints from row to row and then they don't line upward across the flooring. Cutting the boards to length with a circular saw merely keep in mind that perfect cuts aren't necessary; the ends at walls will exist covered past the baseboard and it's OK if the butt joints show small gaps. If you want to speed up the job, rent a sliding miter saw, especially for the bending cuts around the hearth.
Face-nail the first row close to the wall with either 8d cease nails (predrill to avoid splitting) or an air powered 15-gauge stop nailer to speed up the work. Nail into every joist to keep this row from moving when you tap in the next rows. Gear up the nails i/8 in. deep.
Step 6
Use a ability stapler for solid fastening and utilise a cake to tap boards together

Fit the second board's groove onto the tongue of the offset. Tap with a block (flooring scrap) and hammer to drive the boards together. For an antiquarian look, create a small gap (1/16 in.) betwixt the boards with a removable shim.
How to Lay Hardwood Floor With a Contrasting Border
Step vii
How to install tongue and groove flooring: Boom the floor every 2 ft.

Insert shims for even gaps, and nail through the natural language of the board with a flooring stapler. Start at one end of the board and piece of work to the other, nailing every two ft. After the first row, tap each subsequent row into place and smash with a flooring stapler. Boom every ii ft. to tack the flooring in place—the decorative cut nails will hold it tight. Nosotros chose to create a small-scale (i/xvi-in.) gap betwixt boards by inserting plastic putty knives before nailing. The gap ensures that each lath appears carve up and adds to the antiquarian look. Nailing a pine floor is much more forgiving than other flooring, considering gaps are part of the look!
Stride 8
Cut boards to fit effectually corners and notch the boards to fit doorways
Hold the board in identify at doorways and corners and mark for notching with a straightedge. The board merely needs to fit inside 1/4 in. of the wall and slide under the door jamb.
Home Repair: How to Seal Laminate Flooring Expansion Gaps
Stride nine
Notch the boards

Transfer the cutout lines to the back of the board and cut out the notch with a jigsaw. Cutting from the back minimizes splintering of the front face. Marker and then cut the lath to fit at the door jamb. Cut the notch so that it slides about 1/2 in. under the jamb and then the jamb will announced to be completely sitting on the floor.
3 Types of Electric Heated Floors
Step x
Installing tongue and groove flooring: Wedge bowed boards straight

Wedge the boards together if necessary to straighten bowed boards. Cut the wedge from a bit of floor with the groove left on. Drive the wedge between the flooring lath and a scrap lath screwed to the subfloor. Cut badly bowed boards into shorter lengths. Make a wedge to drive slightly bowed boards together. If the gap won't tighten upwards, cut the lath into shorter lengths.
Stride 11
Installing tongue and groove floor: Rout grooves in boards to handle special features

Frame the fireplace hearth with a 6-in. wide board with the natural language facing out. Cut flooring to 6 in. wide to frame around the fireplace hearth. Blast these pieces with the tongue facing out. You'll groove the next floorboards to fit.
Flawless Flooring Sanding
Stride 12
Rout boards to fit the hearth

Rout a groove into the edge of this notched board with a slotcutting bit. The groove must line upwardly with the hearth board'due south tongue. Clench the board securely to the horses or a workbench.
Guide to Installing Laminate Flooring
Slot-cut router bit

Use a router with a i/4-in. slot-cut bit to cut a groove into the edge that abuts the fireplace frame. Set the router cutting depth to match the factory cut grooves.
Footstep 13
Slide the lath forth the hearth

Yous'll have to notch a floorboard to fit effectually the frame. Slide and tap this board into place. Slide the notched slice into place. Use a block and hammer if needed to drive the lath in. The tongues and grooves will align the boards and hold them flush.
Routing

Cutting the next lath to length and groove the end with the slotting cutter.
Footstep 14
How to install tongue and groove flooring: Groove fitting

Fit the lath onto the natural language of both the preceding lath and the hearth trim board. Continue this process to the other side of the hearth.
Groove the ends of the next few boards that butt into the fireplace frame as well. All this grooving will go along the boards around the fireplace frame flush with i another. Use this same technique where floorboards butt into other flooring materials at doorways.
Step 15
Craft the final boards to fit snuggly and install the threshold

Undercutting a jamb where the wood meets another flooring material tin be tricky. Employ a handsaw and a precipitous chisel to finish the cut earlier the last floorboard is installed. Planning is of import, and the layout drawing tin exist invaluable for anticipating difficult fits. Measure, cutting and slide the threshold board nether the jambs at the doorway before the final floorboard is installed. Cut the final full length boards to width with a table saw and check the fit at the threshold.
Step 16
Install the final lath

Angle the final board into place and wedge it tight. Cutting the final board to width and pry and wedge it into position (allow i/four in. between the board and the wall). You may take to put information technology in at an bending and tap information technology downwards. Confront nail the board.
Footstep 17
Nail the threshold in place

Face-nail the threshold and fill all boom holes with putty. You'll have to face-boom the final few rows of floorboards and the threshold lath, considering the flooring nailer won't fit.
Fixing Bouncy Floors
Stride 18
Marking the joists and add style with antique cut nails
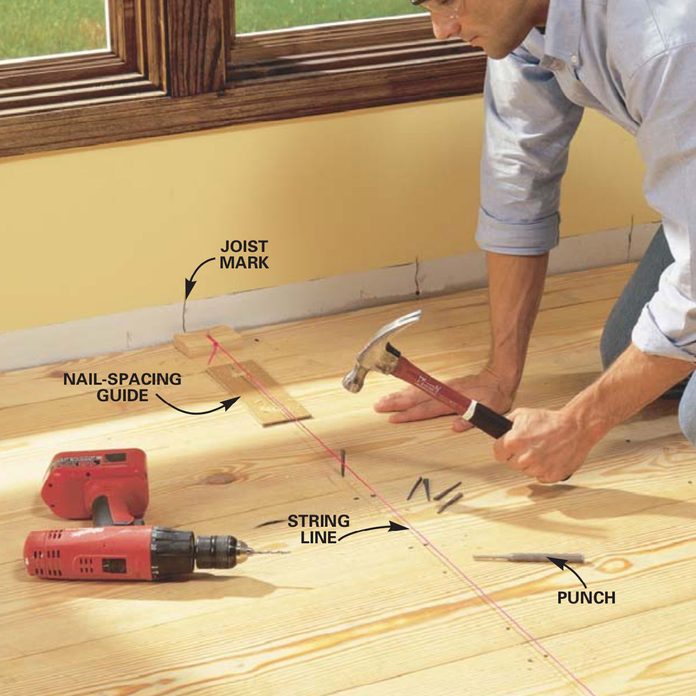
Stretch a string line (not a chalk line) to mark the joists. Drill the pilot holes for the cutting nails using a simple spacing guide. Hammer the cut nails affluent with the pine flooring and countersink 1/8 in. beneath the surface with a heavy punch or countersink. A traditional plank floor was confront-nailed with handmade nails. A two-1/2-in. masonry cut nail has this look. Mark each joist location with a string line (no chalk!) and drill pilot holes for the cut nails. The hole size should be close to the narrow dimension of the rectangular head of the cut nail. Make a unproblematic guide to infinite the nails about i-3/four in. from the lath edge (Photo 18). Two nails are sufficient to hold the 10-in. (nine-in. actual) board flat, only a wider lath will crave three nails. Be certain to gear up the cut nails 1/8 in. below the surface earlier starting the finishing steps. When nailing the ends of boards, splitting is a existent possibility fifty-fifty with pre-drilling. Don't worry; minor splitting adds to the antique look.
Wear an organic vapor–rated respirator when applying the oil. Ventilate your workspace. Oil-soaked rags tin can spontaneously combust. Dry them outdoors, spread out loosely. When they're thoroughly dry out, throw them in the trash.
Footstep nineteen
Rub in an oil finish

Apply a heavy coat of oil with a medium nap paint roller or wool applicator. Later on fifteen minutes utilise a second, lighter coat. Permit to soak in for an additional xv minutes.
Install Prefinished Wood Flooring
Step twenty
Wipe the floor until it's dry

Wipe until dry out; at that place should be no oil sitting on the surface. Our floor textile required but fine sanding. If you're not sanding, clean the flooring with a material dampened with paint thinner. Remove tough dirt or scuff marks with a fine (120-dust) sandpaper. Fill all your countersunk face-smash holes (not the decorative cut nails) with a hardening putty and sand flush with the wood with 120-dust newspaper. Apply putty that closely matches the wood's colour.
Eye pine floors darken slightly with exposure to calorie-free and will age gracefully, taking on a unique mellow color. You'll obscure this natural crumbling (patina) with stain, just if you desire to stain, proceed it light. Try a test piece beginning. Permit the stain dry out for 24 hours and then apply the oil finish.
Use a heavy coat of the penetrating oil, let information technology soak in for 15 minutes and then apply a light glaze where it looks dry. Later another xv minutes, wipe the floor dry out with clean cloths. Practice not exit whatever wet areas—they'll become shiny spots. Allow the oil dry out for 24 hours, vitrify with 150-grit sandpaper or a sanding screen and apply another light coat. Allow sit for 15 minutes and and then wipe up, leaving no puddles. Use this same buffing and oiling procedure to maintain your floor through the years. Depending on traffic and habiliment, oiling needs to exist done every 3 to five years.
Avert sanding if possible.
Little or no sanding may exist required, depending on the quality of the milling. Enquire the potential supplier what it recommends for its product. An accurately milled board volition accept a uniform surface that will accept the stain and/or oil evenly without sanding. Other boards may demand to be sanded. Considering the savings in labor, equipment rental, material cost and dust in the house, we recommend spending slightly more for better milled material that you don't have to sand.
Brand sure whatsoever professional finisher you hire is experienced with pine floors and fully understands their unique character.
Step 21
Sanding a Pine Floor

Pine is soft and must be sanded carefully to avoid gouges. The square buff sander worked well because information technology's less aggressive than pulsate sanders. Even a novice can use information technology with confidence. Kickoff sand loftier spots and rough areas with a portable belt sander (xl-grit belt). Then proceed with the square buff sander using the 60-, 80- and 100-grit papers or screens in sequence. Be sure to vacuum between each dust size. Yous'll take to do a little manus-sanding at the edges and doorways. Also utilise the square buff sander with a 150-grit screen between coats of oil or varnish.

PDF Links:
- Fig A: Floor layout plan
Originally Published: December thirteen, 2018
Source: https://www.familyhandyman.com/project/how-to-install-pine-floors/
Posted by: tripptind1936.blogspot.com
0 Response to "Will Old 1x12 Plank Subfloor Split When Nailing The Hardwood Flooring"
Post a Comment